Tutorial
How to build a content rating system in Plone in few minutes.
Objective
We want to offer to our visitors the ability to click on a “Like” button on any Plone content, and the total of votes must be displayed next to the button.
Note
There is a screencast covering the first steps of the Rapido tutorial.
Prerequisites
Run buildout to deploy Rapido and its dependencies (see Installation).
Install the rapido.plone add-on from Plone site setup.
Initializing the Rapido app
We go to Plone Site setup, and then Theming.
If our current active theme is not editable inline through the Plone web interface (i.e. there is no “Modify theme” button), we will first need to create an editable copy:
- click on “Copy”,
- enter a name, for example “tutorial”.
- check “Immediately enable new theme”.
Else, we just click on the “Modify theme” button.
We can see our theme structure, containing CSS files, images, HTML, and Diazo rules.
To initialize our Rapido app named “rating”, we need to:
- create a folder named
rapidoin the theme root, - in this
rapidofolder, create a folder namedrating.
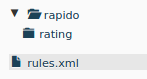
The application is now ready.
Creating the “Like” button
Rapido apps are composed of blocks. Let’s create a block that will render our button:
- go to the
ratingfolder and create a new folder namedblocks, - in this
blocksfolder, let’s create a new block namedrate. To do this, we need to create 3 files:

The rate.html file:
<i>If you like what you read, say it! {like}</i>
This allows us to implement the block layout. It is a regular HTML file, but it
may contain Rapido elements, enclosed in brackets. In our case, we have
one element, namely {like}, in charge of rendering the “Like” button.
The rate.py file
def like(context):
    # nothing for now
    pass
It provides the element’s implementation. Each element in the block has a corresponding Python function having the same id. In our case, that is the code that will be executed when a user clicks on “Like”. Right now, it does nothing, but we will change it later.
The rate.yaml file:
elements:
    like:
        type: ACTION
        label: Like
This file contains all the needed settings for our block. Here we declare that
our block contains one element named like, which is an action (i.e. it
will be rendered as a button), and its displayed label is “Like”.
Now that our block is ready, we can see it using the following URL:

The next step is to embed our block in our Plone pages.
Inserting the block in Plone pages
To include our block somewhere in Plone, we will use a Diazo rule.
Let’s open our rules.xml file in the root of our theme, and add the following
lines:
<after css:content=".documentFirstHeading">
    <include css:content="form" href="/@@rapido/rating/blocks/rate" />
</after>
The include directive allows us to retrieve a piece of content;
in our case, the HTML form produced by our block.
And the after directive inserts it after the main title in our page.
So, now if we visit any page of our Plone site, we see our block displayed just under the title.
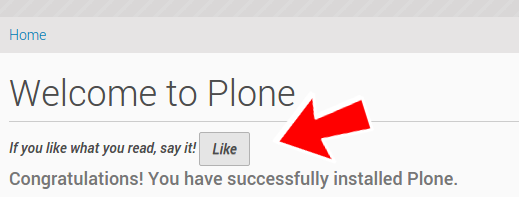
That is nice, but there is a small problem: when we click on the “Like” button, we are redirected to the raw block content, and we lose our current Plone page.
Let’s fix that.
Staying in our Plone page
If we want to stay on our current page after submitting our block, we need to enable AJAX mode.
To do this, let’s change our rate.yaml file like this:
target: ajax
elements:
    like:
        type: ACTION
        label: Like
Now, if we click on the “Like” button, the block is just reloaded dynamically, and we stay in our current page.
Counting the votes
Let’s go back to rate.py, and focus on the like function implementation.
When a user clicks on the “Like” button, we need to get the current content the user voted for, check how many votes it already has, and add one new vote.
Rapido allows to create records, so we will create a record for each content item, and we will use the content path as an id.
So let’s replace our current implementation with:
def like(context):
    content_path = context.content.absolute_url_path()
    record = context.app.get_record(content_path)
    if not record:
        record = context.app.create_record(id=content_path)
    total = record.get('total', 0)
    total += 1
    record['total'] = total
context.content returns the current Plone content, and absolute_url_path is
a Plone method returning the path of a Plone object.
context.app allows to access to the current Rapido app, so we can easily use
the Rapido API, like create_record or get_record.
A Rapido record contains items. The get(item, default=none) method
returns the value of the requested item or the default value if the item does
not exist.
Displaying the votes
Now we are able to store votes, we also want to display the total of votes.
Fist, let’s change the block layout in rate.html:
<p>{display}</p>
<p><i>If you like what you read, say it! {like}</i></p>
So now we have a new display element in our block.
We must declare it in rate.yaml:
target: ajax
elements:
    like:
        type: ACTION
        label: Like
    display: BASIC
And let’s implement it in rate.py:
def display(context):
    content_path = context.content.absolute_url_path()
    record = context.app.get_record(content_path)
    if not record:
        return ''
    return "❤" * record.get('total', 0)
We get the record corresponding to the current content, and we return as many ❤ as votes we have stored.

That’s it! Our rating feature is ready to be used.
Debugging
As we are writing code, we might (we will) make mistakes. In this case, , it is always helpful to read the error messages returned by the system.
It is also very helpful to be able to log messages from our code, so we understand what is going on exactly when it is executed.
Rapido provides the context.app.log() method which will log string messages
or any serializable object (dictionnaries, arrays, etc.).
The log messages and the error messages are visible in the server log (but we might not be able to access it), but also in our browser’s javascript console.
First thing to do is to enable the debug mode in our app.
To do that, we need to create a settings.yaml file in /rapido/rating:
debug: true
And now, let’s change our display function:
def display(context):
    content_path = context.content.absolute_url_path()
    record = context.app.get_record(content_path)
    if not record:
        return ''
    context.app.log(record.items())
    return "❤" * record.get('total', 0)
We will see the following in our browser’s console:

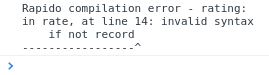
Let’s imagine now we made an error like forgetting the colon at the end of the
if statement:
def display(context):
    content_path = context.content.absolute_url_path()
    record = context.app.get_record(content_path)
    if not record
        return ''
    return "❤" * record.get('total', 0)
Then we get this:
Listing the top 5 items
We would also like to see the top 5 rated content items on the site home page.
The first thing we need is to index the total element.
We declare its indexing mode in rate.yaml:
target: ajax
elements:
    like:
        type: ACTION
        label: Like
    display: BASIC
    total:
        type: NUMBER
        index_type: field
To index the previously stored values, we have to refresh the storage index by calling the following URL:
And to make sure future changes will be indexed,
we need to fix the like function in the rate block:
the indexing is triggered when we call the record’s save method:
def like(context):
    content_path = context.content.absolute_url_path()
    record = context.app.get_record(content_path)
    if not record:
        record = context.app.create_record(id=content_path)
    total = record.get('total', 0)
    total += 1
    record['total'] = total
    record.save(block_id='rate')
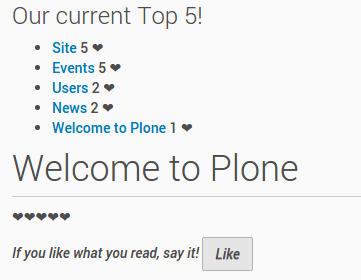
We are now able to build a block to display the top 5 contents:
top5.html:
<h3>Our current Top 5!</h3>
{top}
top5.yaml:
elements:
    top: BASIC
top5.py:
def top(context):
search = context.app.search("total>0", sort_index="total", reverse=True)[:5]
html = "<ul>"
for record in search:
content = context.api.content.get(path=record["id"])
html += '<li><a href="%s">%s</a> %d ❤</li>' % (
content.absolute_url(),
content.title,
record["total"])
html += "</ul>"
return html
The search method allows us to query our stored records. The record ids are
the content paths, so using the Plone API (context.api), we can easily
get the corresponding contents, and then obtain their URLs and titles.
Our block works now:
Finally, we have to insert our block in the home page.
That will be done in rules.xml:
<rules css:if-content=".section-front-page">
    <before css:content=".documentFirstHeading">
        <include css:content="form" href="/@@rapido/rating/blocks/top5" />
    </before>
</rules>
Creating a new page for reports
For now, we have just added small chunks of HTML in existing pages. But Rapido also allows us to create a new page (a Plone developer would name it a new view).
Let’s pretend we want to create a report page about the votes on the content of a folder.
First, we need a block, report.html:
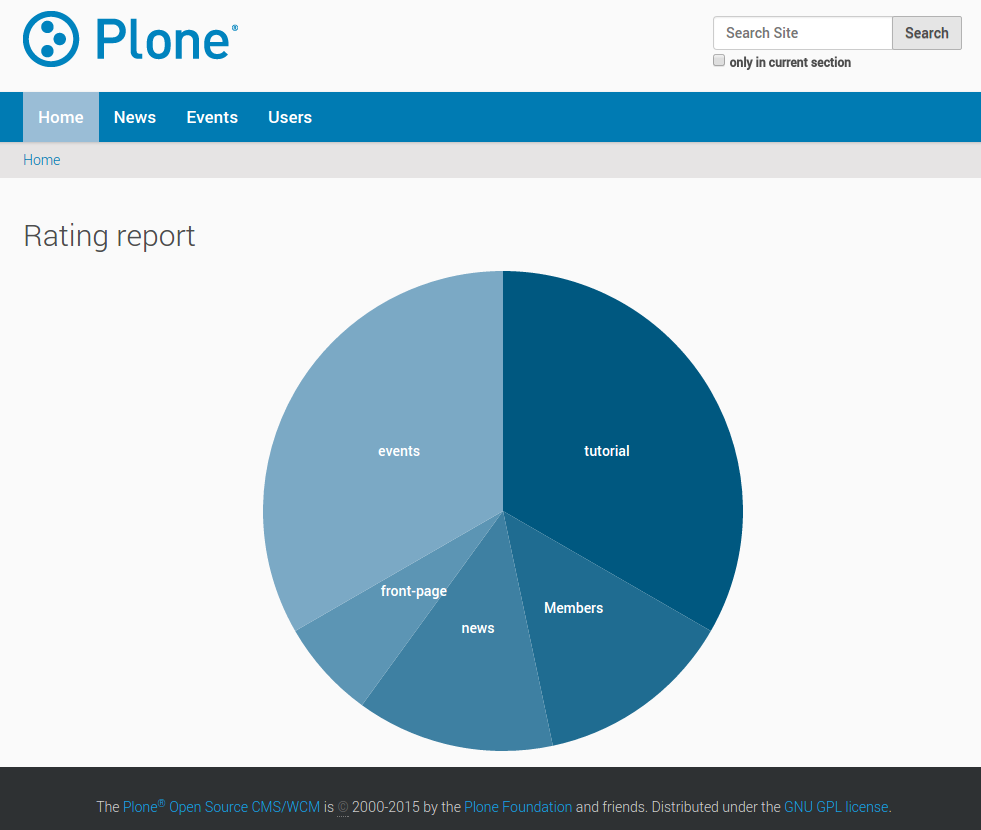
<h2>Rating report</h2>
<div id="chart"></div>
We want this block to be the main content of a new view.
We need to declare it in a new YAML file called report.yaml:
view:
    id: show-report
    with_theme: true
Now if we visit for instance:
we do see our block as main page content.
Now we need to implement our report content. We could do it with a Rapido element like we did in the Top 5 block.
Let’s change our approach and implement a fancy pie chart using the amazing D3js library and the Rapido REST API.
We need to create a Javascript file (report.js) in the /rapido/rating
folder:
// Source: http://rapidoplone.readthedocs.io/en/latest/tutorial.html#creating-a-new-page-for-reports
/* It is a feature of the RequireJS library
 * (provided with Plone by default) to load
 * our dependencies like:
 * - mockup-utils, which is a Plone internal resource,
 * - D3js (and we load it by passing its remote URL to RequireJS).
 */
require(['mockup-utils', '//d3js.org/d3.v3.min.js'], function(utils, d3) {
    /* Get the Plone getAuthenticator method
     * mockup-utils allows us to get the authenticator token
     * (with the getAuthenticator method), we need it to use
     * the Rapido REST API.
     */
    var authenticator = utils.getAuthenticator();
    // Get the local folders path
    var local_folder_path = location.pathname.split('/@@rapido')[0];
    // Get SVG element from the rapido block html named 'report.html'
    var width = 960,
        height = 500,
        radius = Math.min(width, height) / 2;

    /* d3.js Arc Generator
     * Generates path data for an arc (typically for pie charts).
     */
    var arc = d3.svg.arc()
        .outerRadius(radius - 10)
        .innerRadius(0);

    /* d3.js Pie Chart Generator
     * Generates data from an array of data.
     */
    var pie = d3.layout.pie()
        .sort(null)
        .value(function(d) { return d.value; });

    var svg = d3.select("#chart").append("svg")
        .attr("width", width)
        .attr("height", height)
        .append("g")
        .attr("transform", "translate(" + width / 2 + "," + height / 2 + ")");

    // d3.json() calls the Rapido endpoint @@rapido/rating/search (a rest api endpoint)
    d3.json("@@rapido/rating/search")
        // d3.json() puts the authenticator token in the X-Csrf-Token header,
        .header("X-Csrf-Token", authenticator)
        // and d3.json() passes the search query in the request BODY.
        .post(
            JSON.stringify({"query": "total>0"}),
            function(err, results) {
                var data = [];
                var color = d3.scale.linear().domain([0,results.length]).range(["#005880","#9abdd6"]);
                var index = 0;
                results.forEach(function(d) {
                    var label = d.items.id.split('/')[d.items.id.split('/').length - 1];
                    data.push({
                        'i': index,
                        'value': d.items.total,
                        'label': label
                    });
                    index += 1;
                });

                // add arc element
                var g = svg.selectAll(".arc")
                    // call pie() function
                    .data(pie(data))
                    // add g element
                    .enter().append("g")
                    .attr("class", "arc");

                // add path element
                g.append("path")
                    .attr("d", arc)
                    .style("fill", function(d) { return color(d.data.i); });

                // add text element
                g.append("text")
                    .attr("transform", function(d) { return "translate(" + arc.centroid(d) + ")"; })
                    .attr("dy", ".35em")
                    .style("text-anchor", "middle")
                    .text(function(d) { return d.data.label; })
                    .style("fill", "white");
            }
        );
});
That is quite a complex script, and we will not detail here the D3js-related aspects (it is just a typical example to draw a pie chart); we will focus on the way we obtain the data.
The first thing to notice is the require function. It is a feature of the
RequireJS library (provided with Plone by default) to load our dependencies.
We have 2 dependencies:
mockup-utils, which is a Plone internal resource,- D3js (and we load it by passing its remote URL to RequireJS).
mockup-utils allows us to get the authenticator token (with the getAuthenticator
method), we need it to use the Rapido REST API.
Note
- RequireJS or
mockup-utilsare not mandatory to use the Rapido REST API, if we were outside of Plone (using Rapido as a remote backend), we would have made a call to../@@rapido/ratingwhich returns the token in an HTTP header. We just use them because they are provided by Plone by default, and they make our work easier. - Instead of loading D3 directly form its CDN, we could have put the
d3.v3.min.jsin the/rapido/ratingfolder, and serve it locally.
The second interesting part is the d3.json() call:
- it calls the
@@rapido/rating/searchendpoint, - it puts the authenticator token in the
X-Csrf-Tokenheader, - and it passes the search query in the request BODY.
That is basically what we need to do whatever JS framework we use (here we use D3, but it could be a generalist framework like Angular, Backbone, Ember, etc.).
Now we just need to load this script from our block:
<h2>Rating report</h2>
<div id="chart"></div>
<script src="++theme++tutorial/rapido/rating/report.js"></script>
And we can visit:
to see a pie chart about votes on the News items!!
Download the source files of this tutorial.
Note
This .zip file can be imported in the theming editor, but it cannot be activated as a regular theme as it just contains our Rapido app.
The app can be used from our main theme by adding a rating.lnk file in our current theme’s rapido folder, containing:
tutorial
indicating the Rapido app named rating is stored in the theme named tutorial.
And then we can activate our specific rules by adding:
<after css:content=".documentFirstHeading">
    <include css:content="form" href="/@@rapido/rating/blocks/rate" />
</after>

<rules css:if-content=".section-front-page">
    <before css:content=".documentFirstHeading">
        <include css:content="form" href="/@@rapido/rating/blocks/top5" />
    </before>
</rules>
in our main theme’s rules.xml.